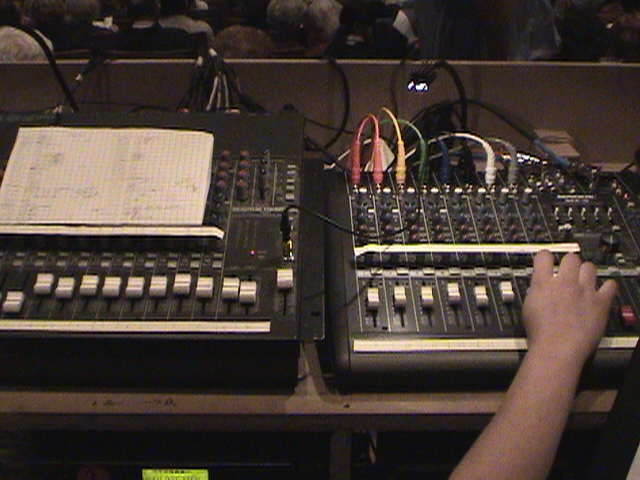
The smaller board is plugged into the main board using one of the aux inputs. This gave us 22 channels for the same cost as renting a board for 2 weeks.

You can see the computer screen in the lower right corner with the big GO. We used the a software package called SFX to run our sound cues. All of the sound cues were recorded as WAVE files and transferred to the hard drive.

Yu Tak is reading the script, clicking the go button for the sound effects and cueing Galit who is pressing the mute buttons as needed.

Nicole is dealing with an actor’s mic pack. Each actor is wearing a mic pack pouch on an elastic band under their costumes.

Notes from a recent class on how to hookup a basic sound system.

The four photos to the right are of the Mackie CR1604 mixing board. I’ve broken it up into four to save some download time. The one on the left is of the aux controls and EQ. The one on the right is of the stereo returns. Here’s a PDF article on mixing…


The photo on the left is of the first 7 channels. The sliders control the volume going to the output controls. The knobs include panning left & right and 3 bands of EQ. hi, mid, & low. You also have mute & solo buttons. The mute buttons are very handy in that you can simply mute the input mic and leave it at the same level. then when you need it up again, hit the button and the level is still set. The photo on the right has the left/right outs as well as a mono out. This board can be set up several different ways. Check out the manual for more info.


Above is a graphic EQ. Each slider controls a portion of the hearing frequency range. Here’s just a couple of ways to use the EQ to improve your sound. Feedback. If you can lower just the range that is feeding back, you can remove it. Effects. Play a deep sounding cannon shot with better low end. You can change the way things/people sound. Don’t go overboard with this. Too much can be a bad thing. If you do get trapped with strange sounding voices, try hitting that Bypass button. If this sounds much better, bring all your sliders back to the 0 mark and start again.
The outputs are split into 6. 3 right & 3 left. Each also split into high, mid, and low ranges. This is for the cross-over functions. We’re not using the x-over for x-over functions. We are using four of the outs, all set to full range. The speakers near the stage are in the high outs and the mid audience speakers are in the mid outs. Then, I’ve set the mid outs to 10milisecond delay. That’s worth about 10 feet of front/back speaker separation. We will be getting an additional delay unit that will work for more then 10 feet. This thing does a lot of stuff! For more info, check out the manual.

4 Mackie SRM 450 Speakers. These speakers are self powered. In other words, they have the amplifier built in. So, we need to run both a signal cable from the mixer and a power cord from the wall. One of the nice things about having the amp in the speaker is that you can plug a mic directly into the speaker and it’ll work. Very easy to use in any room with an electrical outlet.


Below is the old sound equipment from my time at the Berkeley Carroll School. Several schools will still have these older models of equipment for years to come. So, I figured I’d leave the info as is.

Can you spot the speaker? This proscenium is a hard covered flat that is then covered with black velour. The speaker is hidden above the exit sign.

Ah, you’ve found the speaker. This speaker is pushed up against the back side of the proscenium flats. If you look closely, you will see that the plywood is cut away revealing the black velour. The sound waves will travel through the cloth with just a little sound loss. you have to pay attention to setting the proper EQ to compensate for the cloth.

Here is an older model Yamaha sound board.

We have an EQ, a DAT deck, a duel cassette deck and a power amp.

These next three photos are in the order, up and down, that they are on the board. The top knobs are for “trim”, this adjusts level from the mic inputs. The “effects” controls the output to a special effects unit. The “monitor” allows you to listen to each one, or all, of the channels at their own levels.

These three knobs are to adjust the EQ of each channel. We have control of the high, mid, and low frequencies. These are for a rough adjustment. For finer adjustments you need a larger equalizer that has several more choices.

This is a homemade bell and buzzer board. You can see three different bells and one buzzer. they are all wired to a multi volt power converter. Plug it in, press a button, make a noise!


